- Home
- About Us
-
Products
-
IP Video Decoder | Transcoder MP10U H.265 UVC HDMI Media Player 4K 60FPS HDMI CVBS Video Decoder Transcoder H.265 4K HDMI VGA CVBS Video Decoder H.265 4K HDMI SDI VGA CVBS Video Decoder 1RU H.265 4K HDMI SDI VGA Video Decoder
-
IP Streaming Encoder HDMI IP Streaming Encoder SDI IP Streaming Encoder VGA IP Streaming Encoder CVBS IP Streaming Encoder Rack-mounted IP Streaming Encoder
-
Video Capture USB Video Capture PCIe Video Capture M.2 Video Capture
-
Video Converter HDMI/NDI BiDirectional Converter 12G SDI to 4K HDMI Video Converter BiDirectional 12G SDI-4K HDMI Video Converter
-
- Support
- Contact Us


HDMI Media Player Video Transcoder Guide
To effectively use the Transcoding Tool.exe on a Windows OS for our HDMI Media Player, please follow these steps:
HDMI Media Player Transcoding Tool Guide
System Requirements
Windows 7/10/11 (64-bit recommended)
Step-by-Step Instructions
1. Launching the Software - Transcoding Tool.exe.
Unzip the downloaded package to your preferred location.
Double-click Transcoding Tool.exe to launch the application.
(Optional) For advanced users: Refer to readme.txt for FFmpeg command-line options.
2. Importing Your Video
Simply drag and drop your video file into the application window.
3. Configuring Output Settings
| Resolution | Recommended Bitrate | Notes |
|---|---|---|
| 720p | 2500-4000 kbps | Balanced quality |
| 1080p | 4000-6000 kbps | Optimal for HDMI |
4. Rotation Options
90° (Portrait mode).
180° (Upside down).
270° (Counter-clockwise portrait).
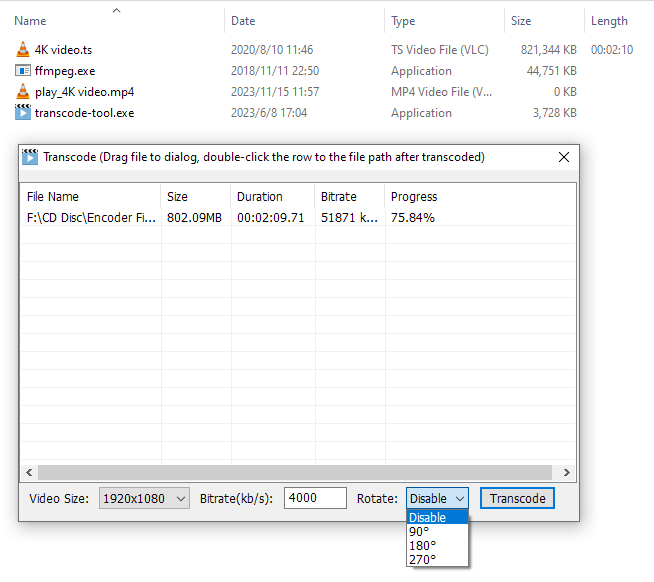
5. Starting the Conversion
Verify all settings.
Click the "Transcode" button (blue arrow icon).
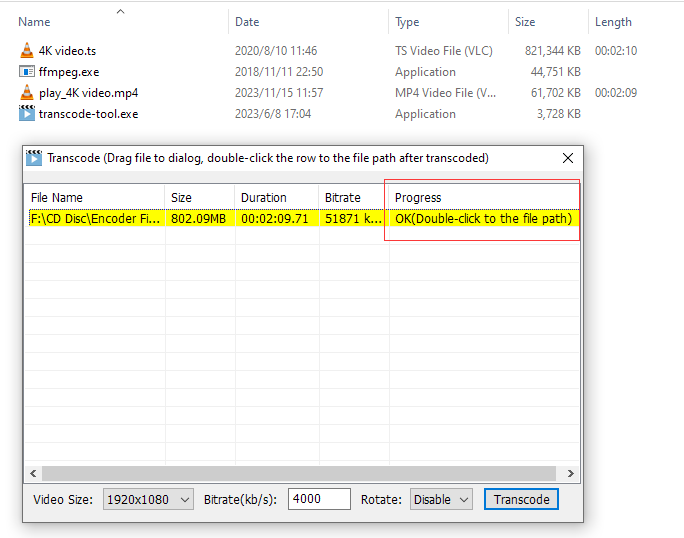
Progress bar will show conversion status.
Output file will be named 'play_[original_filename].mp4'.
6. Accessing Your File
Manual access: Click the yellow status bar path.
File location: Same directory as original video.
7. (Optional) For advanced users: FFmpeg command-line options
#-b:v 2000k - video bitrate value
ffmpeg -i 1.mp4 -vcodec libx264 -s 1920x1080 -r 30 -g 30 -pix_fmt yuv420p -b:v 4000k -profile:v baseline -x264opts "bframes=0" -acodec aac -b:a 128k -ac 2 -ar 48000 -f mp4 play_1.mp4
#keeps original audio codec
ffmpeg -i 1.mp4 -vcodec libx264 -s 1920x1080 -r 30 -g 30 -pix_fmt yuv420p -b:v 4000k -profile:v high -x264opts "bframes=0" -c:a copy -f mp4 play_1.mp4
#Starting from the 10th second, capture 15 seconds of content
# -ss 10 -t 15
ffmpeg -ss 10 -t 15 -i 1.ts -vcodec libx265 -s 1920x1080 -r 30 -g 30 -pix_fmt yuv420p -b:v 4000k -profile:v main -x265-params "bframes=0" -acodec aac -b:a 128k -ac 2 -ar 48000 -f mp4 play_1.mp4
Troubleshooting Tips
❗ If the tool fails:
1. Ensure video isn't DRM-protected
2. Check sufficient storage space
3. Try converting to a different format
4. Restart the application